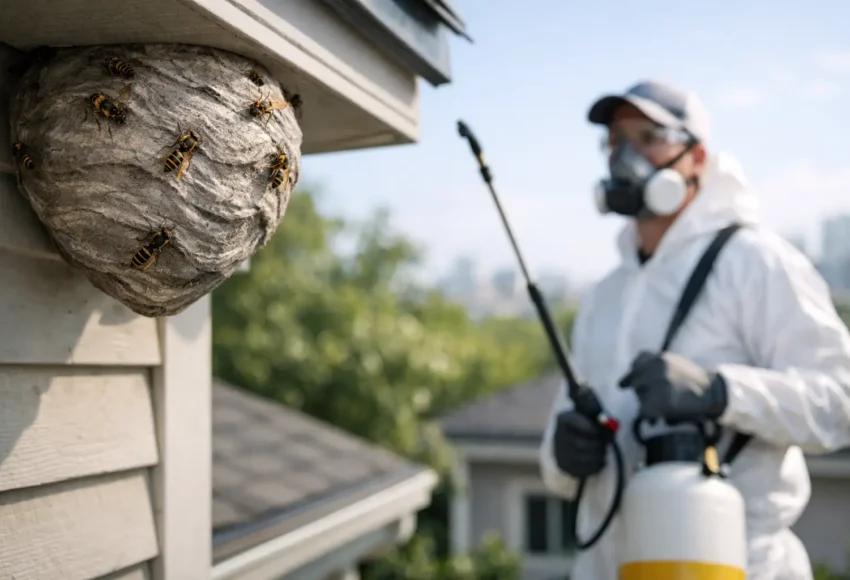
How to Prepare for Wasp Treatment
That buzzing near the soffit or deck rarely stays a small problem for long. If you are searching for how to prepare for wasp treatment, the goal is simple: make the visit safer, faster, and more effective without putting yourself at risk before help arrives.
Most people make the same mistake. They see a nest, get nervous, and either try to knock it down themselves or wait too long because they are not sure what to do next. The better move is to leave the nest alone and prepare the area so a technician can treat it properly. A little prep can reduce delays, avoid accidental stings, and help make sure the nest is fully dealt with the first time.
Why preparation matters before wasp treatment
Wasp treatment is not just about spraying a visible nest. The technician needs safe access, a clear view of activity, and enough room to inspect where wasps are entering and exiting. If the area is cluttered, blocked, or full of distractions like loose pets and active foot traffic, the job becomes harder and riskier.
Preparation also helps protect the people around you. Wasps can become more defensive when they sense movement near the nest, especially in warm weather and during peak daytime activity. Keeping family members, tenants, customers, or staff away from that zone before the appointment is one of the most useful things you can do.
How to prepare for wasp treatment at home or work
Start by identifying the general location of the problem without getting close. You do not need to inspect the nest up close or confirm the species yourself. If you have seen wasps going in and out of a roofline, shed, fence post, wall gap, attic vent, or underground area, that is enough to report.
If possible, make note of when you see the most activity. This can help the technician understand whether it is a small early-stage nest or a larger active colony. A quick description such as “heavy traffic near the back deck in the afternoon” is far more useful than trying to remove part of the nest on your own.
Next, clear the access path. Move patio furniture, toys, garbage bins, ladders, tools, or storage items away from the treatment area if you can do it safely from a distance. The key is not to disturb the nest itself. You are creating room for treatment, not interacting with the wasps.
If the nest is near a doorway, walkway, loading area, or play space, limit use of that area until the appointment. At a business, that may mean redirecting staff or customers to another entrance for a few hours. At home, it may mean keeping children away from part of the yard.
What not to do before professional treatment
The biggest rule is simple: do not try DIY removal first. Sprays from the hardware store can sometimes kill visible wasps, but they often do not solve the full nest problem. Worse, partial treatment can agitate the colony and make professional removal more difficult when the technician arrives.
Do not hit, soak, burn, flood, or seal a nest opening. That includes stuffing holes with caulk, foam, rags, or tape. If wasps are inside a wall, roof edge, or siding gap, sealing the entry point too early can trap them inside and drive them into other parts of the property.
It is also smart to avoid loud lawn work or vibration near the nest before the appointment. Mowing, hedge trimming, pressure washing, or using power tools close to an active wasp site can trigger aggressive behavior.
Preparing children, pets, and other occupants
One of the most overlooked parts of how to prepare for wasp treatment is managing who is nearby. Children and pets are unpredictable around buzzing insects, and that makes them more vulnerable to stings. Before the technician arrives, keep dogs inside, move outdoor pet bowls, and avoid letting anyone play or gather near the treatment area.
If you manage a rental property or commercial building, give basic notice to the people affected. They do not need a long explanation. A short heads-up that pest control is treating an active wasp issue near a specific area is usually enough. Clear communication reduces the chance that someone walks into the treatment zone at the wrong time.
If anyone on the property has a known sting allergy, mention that when booking the service. It may affect how urgently you want treatment handled and how the area is managed afterward.
Getting the property ready for the technician
The technician does not need a perfect property. They need access and accurate information. If the nest is outside, unlock gates and make sure side yards, sheds, or fenced areas can be reached. If the problem appears to be in an attic, garage, or wall void, make sure those spaces are accessible.
Good preparation also means sharing what you have noticed. Mention how long the activity has been going on, whether stings have already happened, and whether you have seen one nest or multiple activity points. In places like Georgina, Keswick, Sutton, and nearby communities where homes may back onto treed lots, sheds, or lake-adjacent spaces, wasp activity can spread across more than one structure. That is worth mentioning if you have seen movement around decks, docks, garages, or eaves.
If you have already used a spray product, say so. That information matters. It helps the technician judge current activity and choose the safest next step.
Should you stay home during wasp treatment?
It depends on where the nest is and how active the wasps are. In many cases, you can stay on the property while treatment is being completed as long as you remain away from the work area and follow instructions. For outside nests, that often means staying indoors or using another side of the building for a short time.
For some situations, especially larger nests near entryways or high-traffic commercial areas, temporary restrictions may make more sense. The point is not to create hassle. It is to lower the chance of defensive wasp activity while treatment is underway.
If you are unsure, ask before the visit. A dependable pest control company should tell you exactly what to expect, including whether pets need to stay inside longer or whether a certain area should remain off-limits after service.
What happens after treatment
Preparation does not stop the moment the technician leaves. You may still see some wasp activity right after treatment, depending on the nest size and placement. That does not always mean the service failed. In many cases, returning wasps are still contacting the treated area before activity drops off.
Follow the post-treatment instructions closely. If you are told to avoid removing the nest immediately, leave it alone. If you are advised to stay away from a section of the yard for a certain number of hours, do that. Those details matter.
This is also a good time to think about prevention. Wasps often return to favorable areas where shelter, food, and entry points are easy to find. Once treatment is complete, it helps to keep garbage sealed, reduce outdoor food exposure, inspect rooflines and vents, and repair gaps around siding or soffits where nesting started.
When fast action matters most
Some wasp problems can wait a day or two. Others should be handled right away. If the nest is near a front door, school pickup area, patio, dumpster, loading zone, or anywhere people regularly pass, faster service is the safer choice. The same goes for homes with young children, pets, elderly residents, or anyone with a sting allergy.
If you need wasp removal, the main thing is not to turn a manageable problem into an emergency by disturbing the nest yourself. Professional treatment is usually quicker, safer, and less expensive than dealing with repeated stings, property access issues, or a colony that spread further than expected.
Knowing how to prepare for wasp treatment gives you a real advantage. You do not need to solve the problem alone. Just keep your distance, clear the area, protect the people and pets around you, and let a trained technician take it from there. A calm, prepared response is often what keeps a bad wasp problem from becoming a dangerous one.
Leave a Comment